Showing posts with label diy. Show all posts

Thursday, February 1, 2018

My favorite self drafted skirt with flounce

I love pencil skirts, particularly when they hit mid calf.  I think this style flatters women in all shapes and sizes. There is something about a modest skirt fitting closely to the shape of the body.  And when worn with heels...watch out.  I just know that whenever I need a feel good, no brainer, outfit I go for a straight pencil skirt.

In the last 2 years, I have made several dozen of said skirts.  I've made most of them in scuba or knit type fabric because they are so easy to make and comfortable to wear.  Scuba (like bathing suit material) travels well and is surprisingly not hot in the summer.  It wicks moisture, never wrinkles, and looks great.  Also, if you have a steady hand, you don't have to hem this fabric.  I've used my rotary blade to make an even cut.

I added a flounce to this skirt just above the knee.  It also has a very comfortable yoga waist. Another alternative is that it can be simply sewn with elastic at the waist.  There are many tutorials out there but here are several that are easy to follow:


Note the hem is unfinished.


Sources:
Calvin Klein jean shirt
Necklace and bracelet by lcdmodern - coming to site soon


Note the yoga waist band - easy and comfy.  
The flounce begins just above my knees - 
good for walking, running, jumping for joy.

Tuesday, February 14, 2012

Free Printable Sweet Nothing Valentines - spread the love

UPDATED 2/14/2018
Since its original inception, links have been broken.  You should be able to double click on printable image below, drag it to your desktop, and open/print as a jpg.  

originally posted 2/9/2011

Our family doesn't go all our for Valentine's Day.  We may exchange cards and the kids always get a small token gift and some candy.  We don't usually decorate or celebrate with fancy meals.  This year, I thought I'd do something surprising and leave little Valentine messages throughout the house.  I'll set these up late at night, so the boys and C can find them in the morning.

Printing on card stock, I made small tags and stand alone cards.  The little tags can easily be attached to pencils, toothbrushes, cups, etc.  The boys will be surprised and think these are fun.  Even my 14 (now 15) year old!


Here is the Sweet Nothing Valentine printable for you.  It's my gift to you this Valentine's Day!  Have fun and spread some love!

Use the extra white space on the printed page and write your own notes (like the scissor photo above)!


Monday, February 13, 2012

Lighted exit sign - DIY trash to treasure

Several weeks ago, I told you about an army surplus store that C and I found. We bought this great red cross flag that we hung in our game room.


I also found an exit sign for $5.00.  I really like collecting signs and thought this would be a great novelty piece.  I simply unscrewed the back, placed some white holiday lights into it, and now we have a fun conversation piece sitting on our bookshelf for less than $10.00.

Wednesday, January 25, 2012

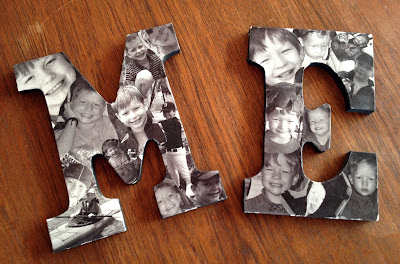
Photo collage letters - wall decor diy


I made these photo collage letters many years ago, but since I took a picture of them for my Day 25: Something you made #Janphotoaday today, I thought I'd share. These usually hang on my wall with various black and white family photos.

Supplies:

Paper or wood letters
I found letters at my local art supply store. They come in various sizes and materials. These happen to be wood.  I chose the first letter of each of my boys. They happen to be "M" and "E."  I like the narcisistic "ME" it spells out.


Photocopied or printed pictures


Decoupage medium
(I use Mod Podge Glue, Matte Finish)

Acrylic paint for edges
(I used black)

1)  Print your favorite photos of each child in black and white (color would be nice, too).

2)  Cut each photo out.

3)  Glue them to the letter with the decoupage medium (watered down white glue). Be sure to overlap the photos for a cleaner collage effect.

4)  Let dry (no worries, it will dry clear). Coat with another layer of decoupage medium. Let dry again. Repeat 2 to 3 times for optimum coverage/protection.

5)  Paint the edges whatever color you'd like.

Hang.  Enjoy.  This is an easy project that will bring you years of smiles.
Pin It

Wednesday, January 18, 2012

Rasterbating in the game room

Now that got your attention, didn't it?!

Sorry, it isn't as lurid as it sounds. It's actually a computer program that enables the user to print larger tiled versions of a photo or image. It's been around for a while and I've always loved the look. I finally have a wall and space big enough for a multi frame display. Here's what I did:

First, I chose a photo that was meaningful for us.  I thought it best to use one with lines and an interesting perspective. This photo was taken from the MOMA a few years ago on our family visit to NYC.

I downloaded The Rasterbator (it's free but be forewarned, it adds Bing to your tool bar which pissed me off). I chose the sizes I wanted: paper and pixel size and overall rows; downloaded the photo and it created a pdf of the photo in 12 sheets of paper.  I would have gone larger but 1) I'm cheap and didn't want to purchase more frames, 2) didn't want to use more ink and paper, and 3) wasn't sure I'd be happy with the end product.  I like the way it turned out so I'd definitely go bigger next time.

I bought 12 inexpensive 8x10 black picture frame (similar to these) from my local superstore. Laying out my images first, I cut them to size and inserted them into the frames.

I eyeballed the placement of the frames as I hung them on the wall. That was mistake #1 but I'm too lazy to actually measure and install.  So, although 12 hanging frames are up, there are about 27 holes behind them.  AND they were still hung at a slant.  C spent an hour fixing them, while cursing under his breath, on Sunday. Anyway, I love how they turned out.  When you walk into our game room, you see the overall layout from afar. What you can't see is that the images are dots, that's why it looks less vibrant than the photo. It has a much more graphic impact in person.
 
The fun thing is that we can change the image(s) anytime we want.  There are so many ways to make this look your own.  You could use thicker frames, white frames, hang the images closer together or farther apart.  I'd love to see what you do with this.


The game room is still a work in progress and on our list of renovation projects. There are skylights and windows throughout but very little ventilation.  This spring, we are going to replace the single paned windows with double panes that open.

We added a newly purchased military red cross flag next to the images. You can see it in yesterday's post.
 
Sophie had a fun interaction with the cow poster. Somehow she noticed it for the first time yesterday. You can see her funny interaction here:


Wednesday, December 28, 2011

Make bookmarks or gift tags from product boxes - recycle DIY

Sometimes the product packaging is as impressive as the actual product.  I have kept many empty boxes with the hope of somehow reusing them.  Usually, I end up tossing them in the recycle bin after they've sat around my studio for a year or so. 


One of our favorite scents is Frasier Fur by Thymes.  My MIL gave us a reed diffuser for Christmas and it smells terrific. The design on the packaing is so pretty.  I'm a sucker for faux bois. And the weight and quality of the box is simply lovely. Yep, I'm a big ol' paper nerd. So, I decided I couldn't let it go.


Using my metal ruler and sharp X-acto knife, I cut the box apart for maximum usage.  I made 3" x 1" strips that will be perfect as gift tags or bookmarks (both of which I use a plenty throughout the year).  I punched a hole in each strip and added some embroidery thread.


 Alternative use:  I love sticking something small like this into orders that I package up from á la mode.


Pin It

Thursday, December 22, 2011

Cookies in a Jar - A great gift anytime of year

'Tis the season for sharing as recipes, printable tags, and gift ideas abound.  Our handmade gift this year is the culmination of several generous resources online that I'm happy to share with you.  Fun to do, engaging for the whole family, and yummy - Chocolate Chip Cookies in a Jar.


Supplies:
quart canning jars
6"x6" fabric squares
twine
gift tags
ingredients below

I used this recipe from All Recipes.  I took the recommendations of others who commented on this recipe and made a few changes:

Ingredients:
2 cups of flour
3/4 tsp baking soda
1/2 c sugar
1/2 c packed brown sugar
2 cups semi sweet chocolate chips (I used 1 c chips/1 c M&Ms)

I made a paper funnel for my jars to make pouring easy.  Mix dry white ingredients together.  Next, I added the following ingredients in order really packing each layer.  I used a small spatula and tapped the jar on the counter for each layer.

flour mixture
brown sugar
M & Ms
chips

Screw on the lid. Tie a fabric square onto the jar with a ribbon , jute or raffia.  Add a tag with the instructions.  I printed the baking instructions on sticker paper (follow the link and feel free to use) and adhered to the back of each tag.  You could also simple print on paper and attach with glue stick.  I found holiday tags generously shared and created by Hey Look - thank you! You could also use my Santa tags or search the internet for other printable tags.

The boys made a batch by themselves following the instructions. The cookies turned out great.  We'll be making more of these in the future (with different color candies or flavored chips for different occasions).

Enjoy!

Wednesday, December 21, 2011

Modern stockings are hung...

Since it's our first year in this old modern house, I felt slightly overwhelmed when it came to decorating for the holidays. I simply couldn't bring myself to unpack our decorations and ornaments. I'd have been flooded with memories. So I thought I'd give us a fresh start this year.  I know that in the years to come our treasured ornaments will be added.

Our tree is minimally and Seussically decorated in a theme of red and bright green glitter. Since you can't see our front door from the street, we hung a jumbo (5') lighted wreath on an outside wall.  Everything is on timers so we don't have to turn a darned thing on or off.  The biggest effort I made this year was sewing new stockings. I thought our modern home could use modern stockings.


I've gravitated toward these colors in our family room (pillows, rugs, blankets).   I used fleece and white faux fur and adhesive letters.


We have a wood burning insert in our family room fireplace.  This made it easy to attach the stockings with magnetic hooks.

The large rock wall separates the living room from our family room.  There is a rather big fireplace on the other side.  The colors in the room started from Daisy Janie's Geo Grand pillow (seen on the chair). Thanks, Jan!
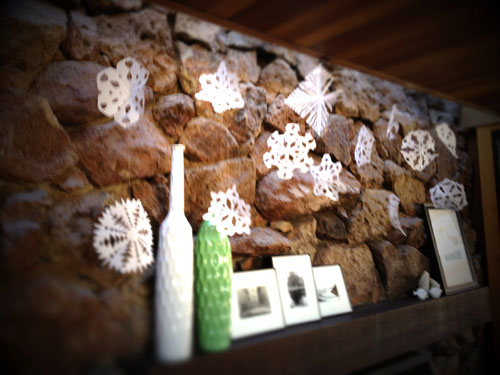
An unintended tradition we have each year is cutting out and hanging snow flakes.This year, we hung them above the fireplace.  Attached under a skylight they move gently and seem to float.  

Did you make anything for your home this year?
What are some of your family decorating traditions?

Wednesday, December 14, 2011

DIY pine cone deer trophy head


This project has been on my work table for months.  The holidays made me eager to finish it because it's perfect for the decor of the season.  I've been collecting giant pine cones since before we moved to Reno.  I discovered them on our first visit out here.  I'm happy to report that I even have some in my yard (which made my wreath decorating a cinch).  If you don't have them readily available, you can purchase them from your local craft store.

List of supplies:

giant pine cone
twigs that look like antlers
unfinished wood plaque (available in various sizes for a few dollars at the craft store)
white paint (or any color you choose)
drill
picture hanger
wood screw
glue gun (not shown)


1.  The first thing I did was paint the base, twigs, and pine cone.


 A dusting of white paint makes it look like it's covered with fresh fallen snow.

 2.  Hot glue the twig antlers onto the pine cone.

 3.  Place a picture hanger on the back.
3.  Add a screw through the center for something to attach the pine cone to on the front.
  Note:  you can see the screw through the front.

4.  Hollow out a small amount of the pine cone back.  Hot glue and insert foam, crinkled paper, or anything the screw and hot glue can grab onto.  I tried screwing directly into the cone but it was too brittle.  Thus several pieces fell off leaving me the hollow area.

5.  Lastly, hot glue the pine cone onto the plaque (and screw) and hold it in place for a minute or so just until it seems stable.  Let dry.
6.  Hang on the wall and decorate.  I made a bow out of wire ribbon and hung jingle bells on to the antlers.  You could string some garland on it, add a red dot nose (Rudolph), ornaments, etc.


I was originally going to paint him bright teal but I thought white would look great for the holidays.  He'll live in my studio and likely change decor with the seasons.  You'll notice in the supply picture that I have several smaller plaques.  I am going to make some with smaller pine cones as well.  I was thinking one with 3 blind mice (is that too un-pc?).

Please, please, send me pictures (or a link) if you make one.  I'll share your work so we can all enjoy our individual interpretations.

If you like this project, please "pin it."  I'd appreciate it.

Pin It

Tuesday, December 6, 2011

DIY wood candle holder

I had an old piece of wood sitting around that I thought would be perfect as a tea light candle holder.  This project is easy and quick. I made mine in 10 minutes on Thanksgiving morning (including time to gather the tools).

Here's what you need:

old chunk of wood (any size; non pressure treated)
ruler
drill
1 1/2" drill bit
marker or pencil


Measure, divide and mark your wood where you want to place your candles.  I drilled 7 holes evenly spaced in the wood.  I steadied the wood between my feet but it would be easier if you used a vice or helper.  Drill straight down and just far enough for your tea lights to fit.


Viola!  That's it.  Now you can decorate this with almost anything for each season.  I used pine cones and branches.  For Spring, you could use shells or berry branches.  For Fall you could use mini pumpkins and gourds. 

Additional ideas:

  • Use metal "C" clamps (they come in various metals at the hardware store - just ask) and attach narrow beaker glass vases (or test tubes) onto the sides for flowers. I saw the vases at Target for less than $2 each.
  • Drill the holes deep enough to insert vases directly into the wood.  You could make this with all vases or a combo of vases and tea lights.
  • Paint (water base), decoupage, or embellish the wood.

  • Put them in your fireplace for easy ambiance.
Your options are endless.  Let your creativity flow. 

If you make one, please send me a photo or link.  I'd love to see where your creativity takes you.


Pin It

Wednesday, November 30, 2011

Do it yourself guest Makeup Washcloth

Here's an easy do it yourself project that will add comfort to your house guest's stay.  Purchase several black face clothes and add a lush ribbon and "makeup washcloth" tag.  Now your light or white towels will stay white and your guests will not worry about leaving mascara marks.  They are a great attention to detail your guests will appreciate.


These tags can be easily written by hand or feel free to print out the tags I made.  I used a 2" hole punch to cut out my circles but you can also cut them out by hand (pinking shears, too).  Here's a gift idea:  put together a basket of 3 or 5 and give them as a gift to a friend for their guests.  Get creative...Enjoy!

Printable Makeup Washcloth tags here.

Friday, October 28, 2011

Halloween in our new home || OM [one moment] meetup

 
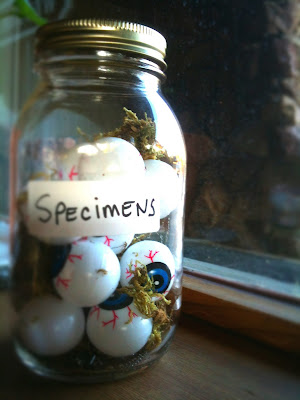
DIY - Mason Jar, ping pong eyeballs, moss

If you know me or have read this blog for a while, you know I love Halloween.  This year, in our new house, I was faced with a big decorating dilemma (insert sad trombone here).  Our decor worked for our Rhode Island colonial and smaller yard.  We had windows that could feature Mortimer or my lady in waiting, Madge. Our new home has walls of windows and sits pretty far from the road.  We live on a dead end street and really don't get much traffic.  For the most part, I'm decorating for the few kids on our street and for myself.

I began pulling the decorations from boxes.  As I set up our gravestones (most of which we had made several years ago) in the front yard, I realized how minuscule it looked compared to our graveyards from years past. The witch and cauldron were unrecognizable from the street.  Maybe it was time for me to throw in my witch hat.  I don't feel like starting over.  Anyway, it took me years to build up my Halloween collection for our old house.

In my sad Charlie Brown shuffle, I put up some things near our front door for the few trick or treaters I expect from the neighborhood.

 DIY ghost milk jug lanterns  - I want to collect enough to make a very long row of ghosts
When I set up the spotlight on the cemetery, serendipitously, it created huge shadows of the gravestones on the wall of the front of the house.  The silhouettes are so creepy and eerie.  They can be easily be seen from the street.  From now on this is the only decor I need each year!  AND, I can create different vignettes by cutting out spiders/webs, zombies, witches, ghosts, anything each year and hanging them in front of the spot light. I don't have to buy more decor and I can still be creative each year.  And think of the money I'll save! Now that's a moment!


What was your moment this week?


Tuesday, October 18, 2011

Turn a coaster into wall art with embroidery hoops :: DIY

A friend had a coaster that she liked and was saving to display.  She liked the colors, subject matter, and at the very least could put it on her frig with a magnet.  She emailed me and asked, "what would you do with it?"  So exciting.  This is my favorite kind of challenge.  Taking and every day something and making it spectacular.  I immediately had some ideas.

Of course, you could frame the coaster but that was kind of ho hum.  I  thought it would be cute to find retro fabric and use embroidery hoops as the frame.  They are so much cheaper than frames, too.  I buy mine from the local fabric mill for $.50.  Simply punch a few holes in the coaster and hand stitch it to the fabric in the hoop.


DIY embroidery hoop art


I decided to make it a threesome and added two more hoops with a cute contrasting fabric.  I created a small "home sweet home" image (I even made the silhouette match their house) on the computer, printed it, cut it out, and stitched it on the fabric as I did the coaster.  The three hoops together make more of an impact, don't you think?

embroidery hoop art from a coaster
embroidery hoop art

You can do this with anything:  menu, vacation graphic, photo, postcard, etc.  If you have something you've been holding onto but don't know what to make of it, send me a picture.  I love a good challenge!

Related Posts with Thumbnails